COD2 SKINNING TUTORIAL
Author: MCh2207Cz
Here you can read the tutorial as TXT file.
Note that in folder "SeeFiles" there is a lot of file stuff aimed for maximalize the example.
Note that in folder "SeeImages" there is located the whole image content
Note that in folder "EnclosedFiles" there are enclosed all (2) needed add-ons/plug-ins.
Topics
covered:
(A) Tool list
(B) Skinning process
(C) Advanced
(A)
Tool list
Firstly you will need this stuff...
1) Programs/applications:
----Editpad Lite...REQUIRED PROGRAM
DOWNLOAD:
http://www.editpadpro.com/editpadlite.html
USE! Making COD2 type material files.
NOTE! WITHOUT GOOD TEXT EDITOR/HEX EDITOR YOU WILL BE NOT ABLE TO MAKE
MATERIALS!
----XmodelExporter...REQUIRED PROGRAM
DOWNLOAD:
http://www.diegologic.net/CoD/XmodelExporter.htm
USE! Exporting skin files (DX7 - color maps and DX9 - normal, spectacular
maps).
USE! Reviewing the model itself without starting COD2.
NOTE! New versions of the program are appearing quite quickly, check the
program's site for updates.
----Adobe Photoshop (CS series) (or any other graphic editor capable of alpha
blending and friendly with *.dds files)...REQUIRED PROGRAM
USE! Making the skins for your models.
NOTE! I cannot speak for the new versions but version CS2 and lower DO
NOT HAVE *.dds FORMAT AS DEFAULT OPENABLE FORMAT.
NOTE! SO APPLY THE DDS PLUGIN ENCLOSED TO THIS PACKAGE.
----WTV (Windows Texture Viewer)...RECOMMENDED PROGRAM
DOWNLOAD:
http://developer.nvidia.com/object/windows_texture_viewer.html
USE! Viewing the *.dds images much faster than via Adobe Photoshop.
USE! Alpha-blending view and separate channel view enabled.
----IWI converter "IWI to DDS"...REQUIRED PROGRAM
DOWNLOAD:
http://callofduty.filefront.com/file/IWI_to_DDS_Converter;52922
USE! Converting *.iwi images into *.dds images.
----DDS converter "DDS to IWI"...REQUIRED PROGRAM
DOWNLOAD:
http://callofduty.filefront.com/file/Image_to_IWI_Converter;51975
USE! Converting *.dds images into *.iwi images.
2) Add-ons, plug-ins:
----DDS PLUGIN FOR ADOBE PHOTOSHOP (CS series)...REQUIRED PLUGIN
ENCLOSED IN THIS PACKAGE - filename: "DDS_Plugin.zip"
USE! Saving ability into the *.dds format.
----A LOT OF PATIENCE :-)
Install these programs before you start anything from this
tutorial...
----Editpad Lite
----Adobe Photoshop + DDS PLUGIN
After installation, continue reading...
All these tools will be necessary for:
1) Making the skin file itself.
2) Importing/exporting from/to DDS file format with Adobe Photoshop.
3) Viewing the material files of CoD type Xmodels to see which skins to modify.
4) Converting CoD2 type format of skins (*.iwi in data folder "images") to DDS file format that can be opened with Plugined Photoshop CS ("DDS" = Direct Draw Surface).
5) Converting new skin to the CoD type format of skin (*.iwi).
6) ADVANCED: Viewing the prepared new skin with all the information (alpha blend, mip maps, file loading memory, type of DDS format,...).
7) ADVANCED: Viewing the CoD type Xmodels without starting the CoD2 itself.
(B) Skinning Process
0) If you did not so, install the Adobe Photoshop, DDS plugin for Adobe Photoshop, install the Editpad Lite,
set up WTV, set up the XmodelExporter.
Adobe Photoshop and Editpad Lite has installation program.
WTV and XmodelExporter do not require installation - just drop them in a permanent directory (I do not recommend "Program Files") and at first start up it will require some information.
The
DDS plugin's files has to be copied this way - "dds.8bi" in directory
"...\Adobe\Adobe Photoshop CS2\Plug-Ins\File Formats" and "mscrll.dll" in directory
"...\Adobe\Adobe Photoshop CS2".
1) I hope you have the WinRAR to be able to open CoD2 data files (*.iwd) located in "Main" folder, if not download it
(http://www.rarlab.com) and istall it as well.
2) The CoD2 data files (*.iwd) contain almost all of necessary stuff to run the game. When you open one of these you will be able to see several folders.
While skinning we will be interested in these folders:
| images | Contain the skins in *.iwi format. |
| materials | Contain the materials for Xmodels. |
| In the material it is written which skin to search for in "images" folder. | |
| The name of materials for Xmodels always begins with "mtl_". | |
| xmodel | Contain the Xmodel |
| In the xmodel it is written which material to search for in "materials" folder and other for skinning unimportant things4) Make a working folder where you will store all your files of the skinning process, let's say you name it "MYSKIN". |
5) Make these folders in "MYSKIN":
MYSKIN_images
MYSKIN_materials
MYSKIN_xmodel
Copy the Iwi to Dds converter and Dds to Iwi converter to "MYSKIN_images" in "MYSKIN".
6) Well we are ready now. Decide what weapon in CoD2 to reskin. Let's say the MP-40.
7) Open the *.iwd data file where "xmodel" folder is located (iw_13.iwd).
8) Copy the xmodel files "weapon_mp40" and "viewmodel_mp40" to the folder "MYSKIN_xmodel" in "MYSKIN".
Xmodels that begin with "weapon_" are static worldmodels carried by AI for example.
Xmodels that begin with "viewmodel_" are animated models carried only by player in first person view (these are the most detailed weapon models).
9) Open both these files with Editpad Lite. You will see this - See
image: "Editpadlite_Viewmodel_MP40.gif" and "Editpadlite_Weapon_MP40.gif"
Find in the text words beginning with "mtl_".
The name that is written in both xmodels is "mtl_weapon_mp40".
9) This name is the file you need to find in the "materials" folder in CoD2's *.iwd file (iw_13.iwd).
10) Once you found the material copy it to the folder "MYSKIN_materials" in "MYSKIN".
11) Open the material file and you will see this - See
image: "Editpadlite_Mtl_Weapon_MP40.gif"
Find the word "ColorMap".
The word before "ColorMap" is the name of the skin in *.iwi format located in folder "images" in CoD2's *.iwd file (iw_08.iwd, iw_09.iwd, iw_10.iwd, iw_11.iwd, iw_12.iwd, iw_13.iwd, localized_english_iw10.iwd, localized_english_iw11.iwd).
Names of skins often ends with "_c" or "_col" or "_color".
12) Find the *.iwi format skin file and copy it to the folder "MYSKIN_images" in "MYSKIN".
In our case "weapon_mp40_c.iwi".
13) drag the *.iwi file "weapon_mp40_c.iwi" and drop it on the icon of the Iwi to Dds converter. A new file in DDS format will appear. It will have quite the same name: "weapon_mp40_c.iwi_out.dds".
14) Open the DDS file with Photoshop CS.
15) I recommend to open the DDS file and immediatelly save it as a TGA or PNG or BMP in the folder "MYSKIN_images" in "MYSKIN",
then make all changes to the skin and save it into, then save the result as DDS again by overwriting the file "weapon_mp40_c.iwi_out.dds" in the folder "MYSKIN_images" in
"MYSKIN".
NOTE! While saving to DDS an export window in Photoshop will be opened with several options of saving - set all the options as
here - See
image: "DDS_Saving_01.gif"
All this because the DDS format is a COMPRESSED
FORMAT! While saving too much times you can lost quite a lot of detail.
These formats are good for storing:
-TGA = targa, no compression, option of alpha blending.
-PNG = Portable Network Graphic, no quality lost, option of transparency.
-BMP = Bitmap, no compression.
16) Rename the file "weapon_mp40_c.iwi_out.dds" to "weapon_mp40_c.dds".
17) Drag the file "weapon_mp40_c.dds" and drop it on the icon of the Dds to Iwi converter.
18) The old "weapon_mp40_c.iwi" (in the folder "MYSKIN_images" in "MYSKIN") will be overwritten.
19) Now you have to make the *.iwd file.
Make a copy of a smaller *.iwd file in "Main" folder of CoD2 and name it as "zzzz_mp40.iwd".
Make a new folder in "Main" of CoD2: "images" and copy your "weapon_mp40_c.iwi" in it.
Open "zzzz_mp40.iwd" and add the folder "images" with your "weapon_mp40_c.iwi" in it to the archive "zzzz_mp40.iwd".
Now delete all of files and folders from the "zzzz_mp40.iwd" except from "images" folder with "weapon_mp40_c.iwi" file.
20) Play game and enjoy!
(C) ADVANCED
1) WTV
You can view all DDS files with WTV. It is good to associate the DDS files with WTV. See the WTV's readme for further instructions.
2) Xmodelexporter
See
image: "XmodelExporter_Skinning_01.gif"
-You can view the Xmodels and their materials and skins with Xmodelexporter.
-Read its Readme for usage.
See
image: "XmodelExporter_Weapon_MP40_01.gif" and "XmodelExporter_Viewmodel_MP40_01.gif"
-By viewing the xmodel you can find errors of your skin - you can rotate it, zoom it, shift it.
See
image: "XmodelExporter_Weapon_MP40_02.gif" and "XmodelExporter_Viewmodel_MP40_02.gif"
-When opening the xmodel all skins used (picture - left top) and the xmodel itself (picture - right bottom) is shown, you can freely move between them.

See
image: "MP40_Color_Map_01.jpg" and "MP40_Color_Map_With_Polygon_Map_01.jpg"
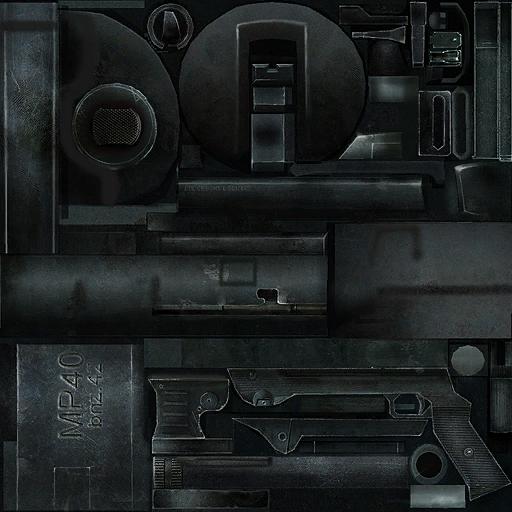

-You can toggle several things off or on, the most useful is showing the polygon map.
-Polygon map shows you the active places of the skin used for xmodel.
-Polygon map is created from differently shaped triangles.
-Polygon map helps you find places which to change on the skin.
-HINT: you can hit printscreen button on keypad and make a screenshot of a polygon map ("XmodelExporter_Viewmodel_MP40_01.gif"), then adjust it to the size of the skin.
("MP40_Color_Map_With_Polygon_Map_01.jpg") and save, then you can fill the different groups of triangles with different colors, then save it to DDS format and use it as a skin in xmodelexporter, you can view the model then and see which parts of the skin are used for which parts of the model.
3) Direct X 9 addition textures
Well in fact a large number of models in CoD2 contain 2 extra image files to the skin - normal map (bump) and spectacular map (spec).
These 2 images are also in *.iwi format and their names always begin with "~".
These 2 images are a kind of filthers that are turned on while playing CoD in Direct X 9 mode.
The normal map makes the 3D effect.
The spectacular map makes the shine effect.
These 2 images can be also converted to DDS and modified with Adobe Photoshop.
You must be extremely careful while modifying these 2 images cause it can make the ingame look of the skin very awful.
To effectively modify these 2 images you have to handle alpha blending in
Photoshop...
4) Skin Resolution
When you open the skin you can see that the size of the skin is the power of 2 (2, 4, 8, 16, 32, 64, 128, 256, 512, 1024, 2048,...).
For example the skin of the MP-40 has the resolution: 512x512 (width 512 pixels, hight 512 pixels).
You can freely make the skin larger or smaller but the size has to be power of 2.
In common we can say that the larger the skin the better the detail.
It is recommended not to overcome the size of 1024 or 2048 pixels, some graphic cards cannot handle too large skins.